
2.0 Linear Processing
Linear Processing for me consists of a number of steps which take us up to the point where we will stretch the image. The process below is what I use for RGB images captured using my DSLR. The very first step is to Apply an STF Auto Stretch; open the process ‘Process Menu > All Processes > Screen Transfer Function’. This is a very powerful tool, it is important to understand that this tool does not edit your image in any way; it simply applies a temporary change to let you see the image more clearly. Follow the steps below.
- If you are processing a colour image you want to deselect the ‘Link’ option in the upper left, this allows the tool to adjust the different colour channels independently.
- Now click the ‘Auto Stretch’ icon, it looks like a radiation warning sign.
- You will now notice your image changes from mostly black to show the detail inside the image.

2.1 Dynamic Crop
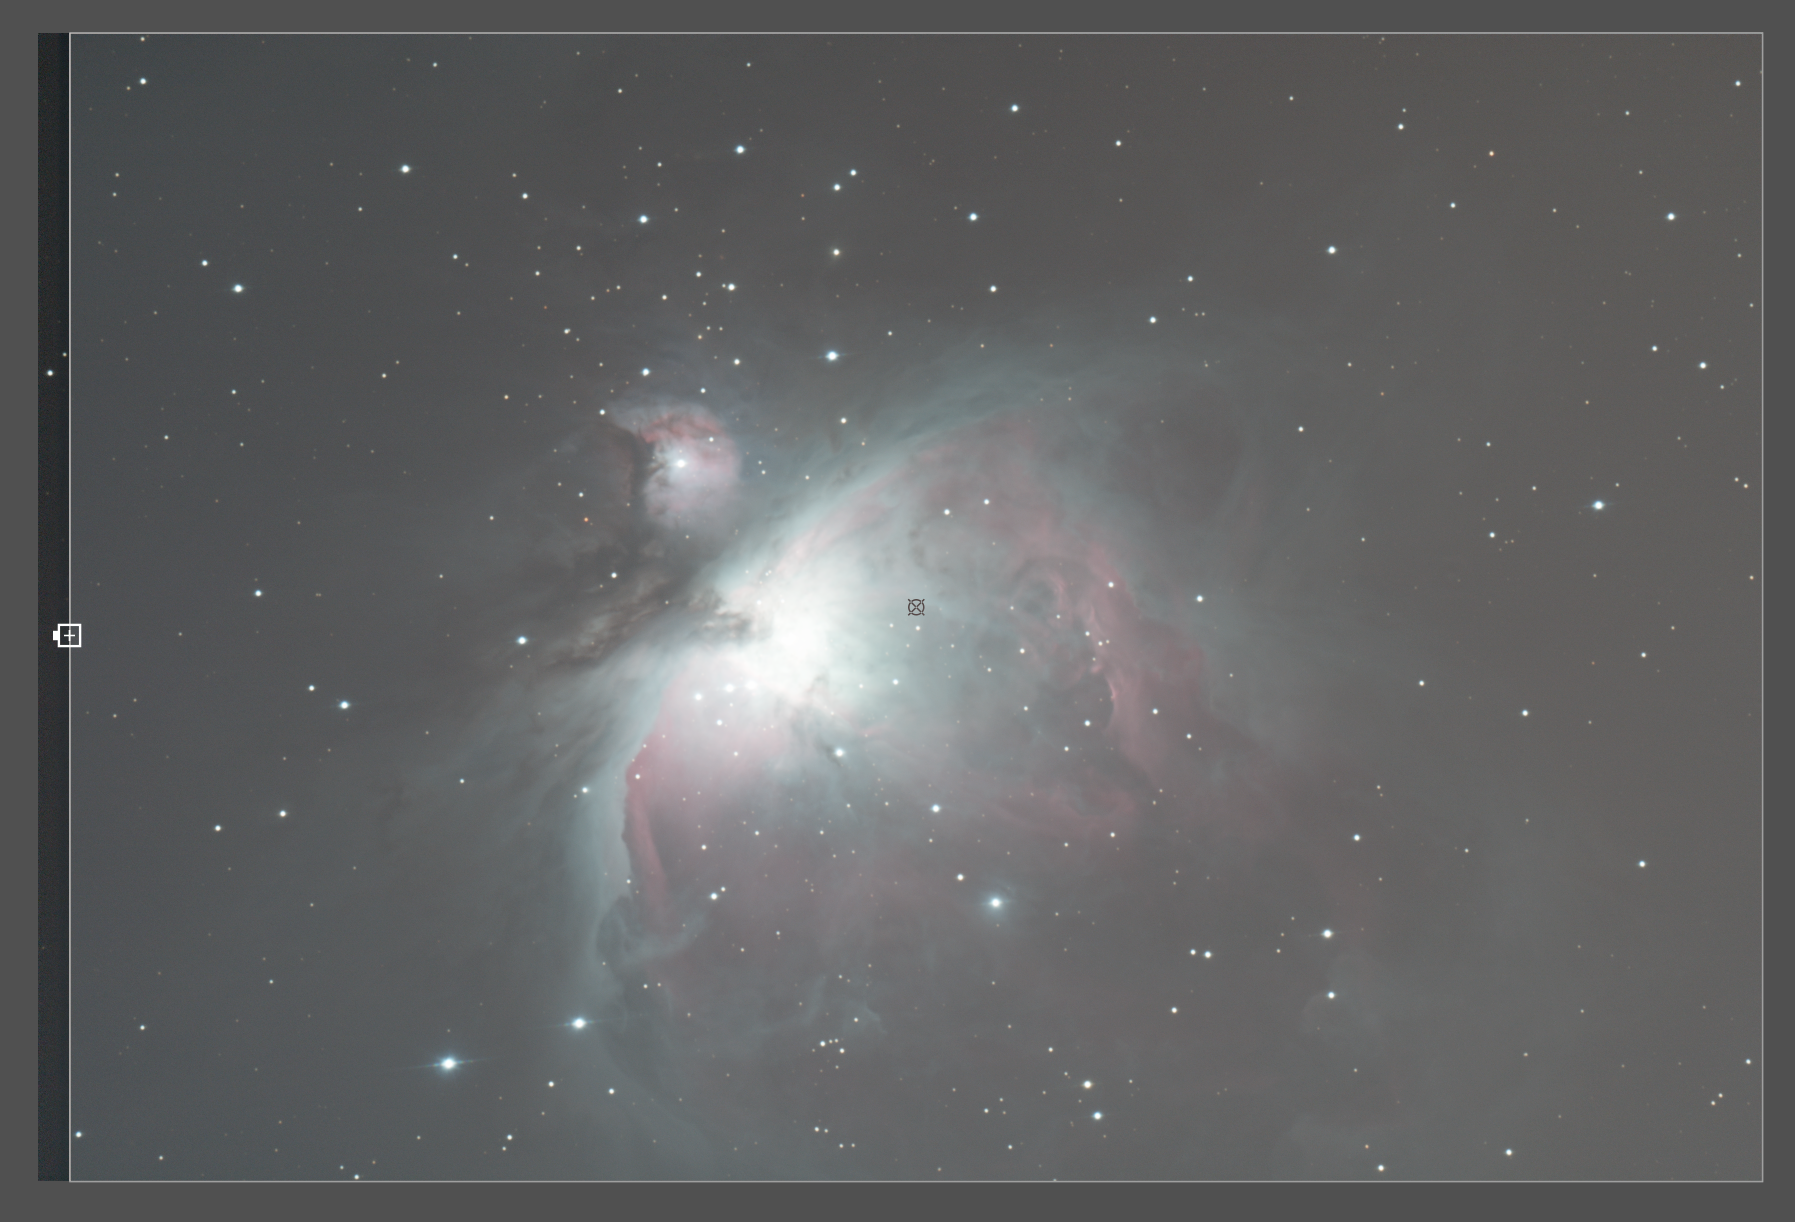
This tool lets you remove any artifacts from the alignment and integration processes which often exist around the edges of the image. These are very common when you use dithering when capturing data. Alternatively it can be used to reduce the amount of the image you are going to process which is useful if you have a small taget. Open the process, ‘Process Menu > All Processes > Dynamic Crop’.
- First click the ‘Reset’ icon at the bottom right on the process and this will select your active image.
- It may help if you zoom out on the active image to see the white border lines.
- Hover the mouse pointer over the white border line on the edge you wish to crop, you will see an icon which looks like a square with one side bold (shown in the screenshot below). Click and hold the left mouse button and drag the border to the desired position and release the mouse button.
- Repeat the step above for any other sides you wish to crop.
- To apply the crop simply click the ‘Execute’ icon, it’s a green tick. This is the process complete.
It’s worth noting that this process has other options including changing the centre position of the image and also rotation of the image.
2.2 Background Extraction
There are two main options for this:
- Automatic Background Extraction.
- Dynamic Background Extraction.
2.2.1 Automatic Background Extraction
This process is mainly used for images that have no nebulosity, like star clusters. I generally use this process with the settings shown in the image below. Open the process at ‘Process Menu > All Processes > Automatic Background Extractor’.
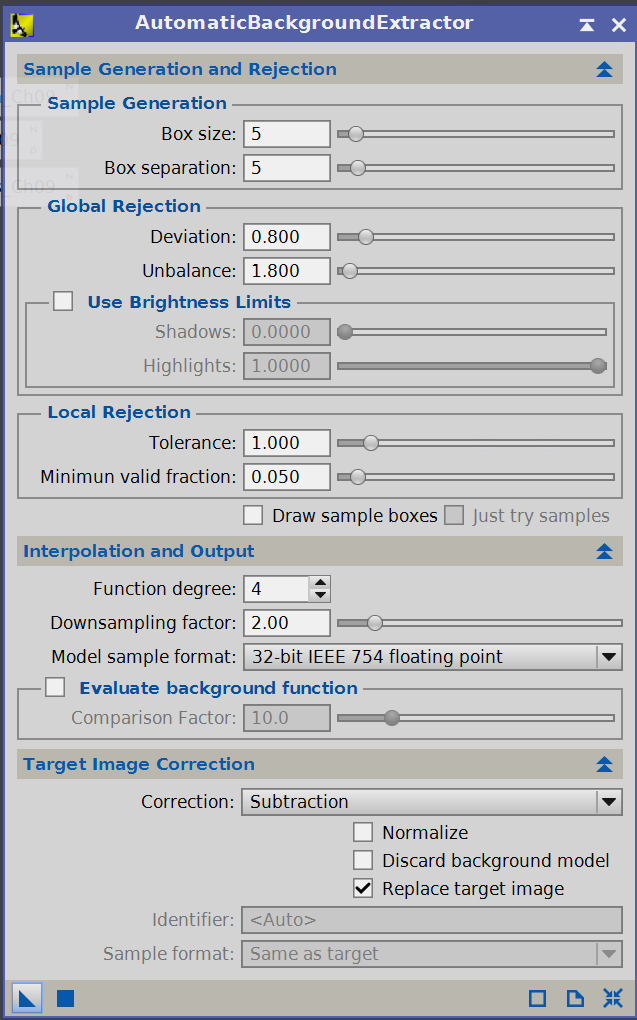
To apply this process simply click the ‘Apply’ button (Blue Square) or drag the ‘New Instance’ button (Blue Triangle) and drop it onto the image you wish to apply the process to.
Once the process completes you will see your original image change in appearance, simply reapply an STF Auto stretch to see the background corrected image. The other image shows you the background the process is extracting, to see this you can apply an STF Auto stretch to it, otherwise just close that image. That is the process complete.
2.2.2 Dynamic Background Extraction
There are many different methods for this process, I will define the one I use which is generally recommended for anyone who uses drizzle integration to stack their images. Open the process, ‘Process Menu > All Processes > Dynamic Background Extraction’. Update the settings to match the screenshot below.
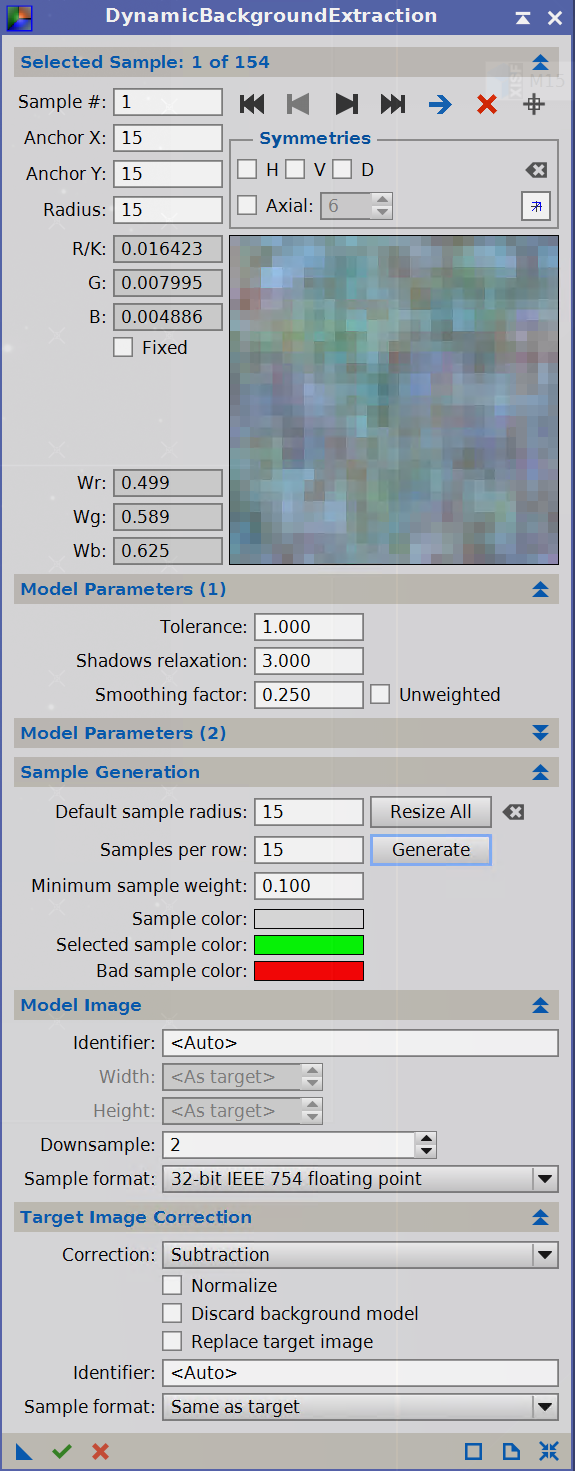
- Click the ‘Resize All’ button, then the ‘Generate’ button.
- You will see that the target image now has a grid of small ‘x’ marks on it, these can have different colours.
- Grey X – This is a valid sample point.
- Red X – This has been defined automatically to not be over background
- Green X – This is the selected sample point.
- If you feel that there are sample points over nebulosity you can reduce the Tolerance value to have the process filter out more points. Once you have changed this value you should click the ‘Generate’ button again to see the sample points update.
- Once you are happy with the sample points, apply the process by clicking the ‘Apply’ icon (Green Tick).
Once the process is complete you will see two new images appear, one is the new image with corrected background; the other is the background itself. As with ABE you should apply an STF Auto Stretch to each to see the contents & discard the Background image.
2.3 Canon Debanding Script
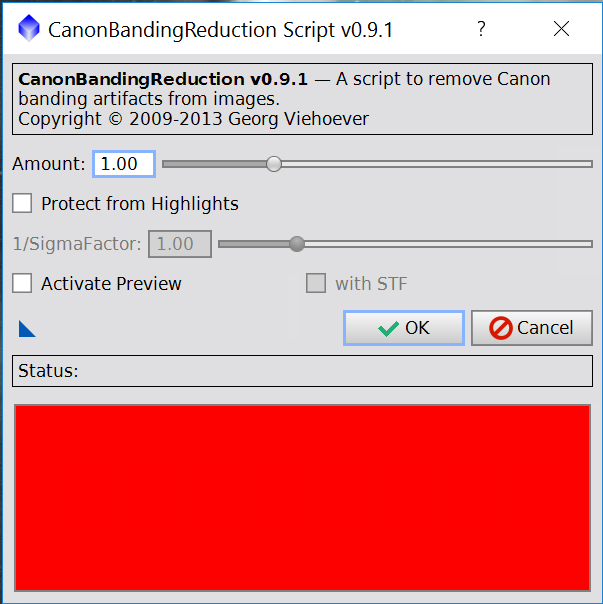
This script is very useful for people who use Canon cameras to capture their data, I often find the horizontal lines are present in the image. This script is very easy to use, firstly make sure you have the target image open and active, then open the script. ‘Script Menu > Utilities > Canon Banding Reduction’.
- I generally use the default settings.
- Simply Click the ‘OK’ button to apply the process.
- If you feel the correction wasn’t strong enough you can adjust the ‘Amount’ value upwards and reapply the process.
2.4 Photometric Colour Calibration
This new process was released in Summer 2017, unfortunately it wasn’t released with documentation so I have mainly got it working through trial & error. If I come across a detailed guide I will update this article. Open the process, ‘Process Menu > All Processes > Photometric Color Calibration’.
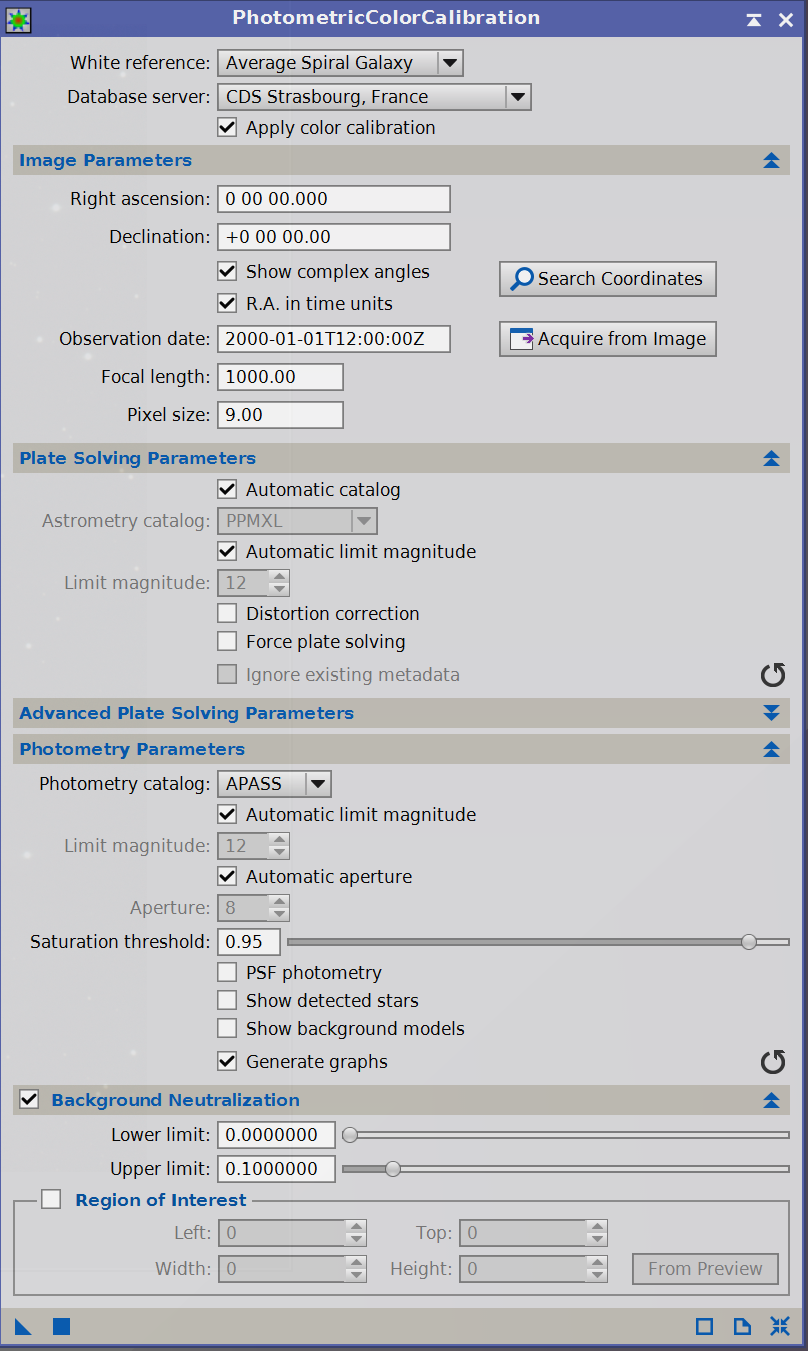
White Reference
Adjust this to suit your image. I have only used this with ‘Average Spiral Galaxy’ as this is hwat Pixinsight recommend. You could also try 'Elliptical Galaxy' or 'G2V Star'.
Database server
I leave this to be ‘CDS Strasbourg, France’ as I get errors communicating with other servers & this one seems very reliable.
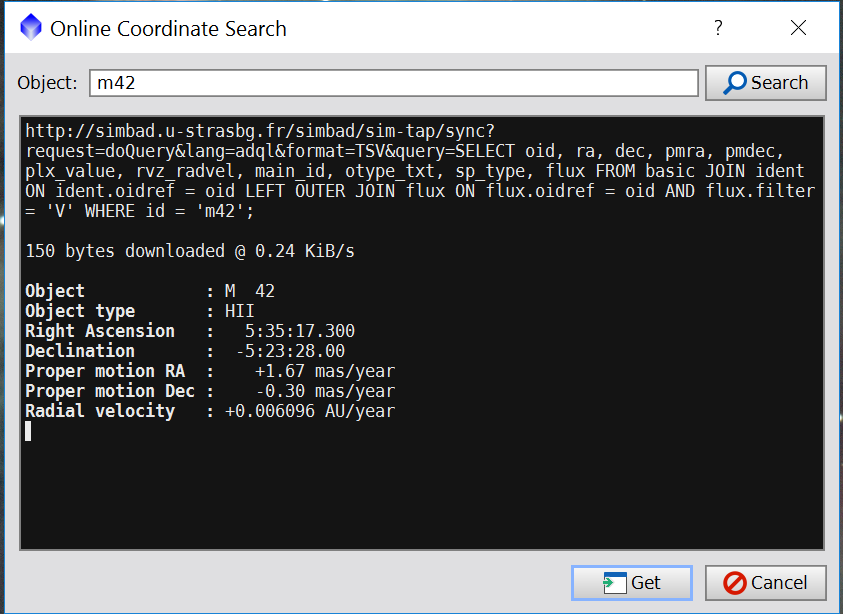
Image Parameters
Click ‘Search Cordinates’, Type the target name in the ‘object’ box and click ‘Search’. Once it gets results click ‘Get’ and the Right ascention & Declination will update in the photometric color calibration box.
Now change the ‘Focal length’ & ‘Pixel size’ to match your equipment. You should be able to look up the pixel size for your camera online. In this article, Karon Mercieca gives some interesting information regarding how you should adjust the focal length value if you used Drizzle Integration or you are running this process on a mosaic image I haven't experienced any solving problems with Drizzle Integrated images but this method did allow me to solve an Andromeda image which was a 2x2 mosaic and also each pane was drizzle integrated. To calculate the Focal Length Value use the following equation:
Focal Length Value = ( Image Width / Sensor Width ) x Telescope Focal Length
Where the width units are pixels.
Next you should adjust 'Saturation Threshold', to find the right value disable the Auto Stretch and use readout mode over a saturated star and set the value to be slightly less than the lower value of the R, G and B reading. In my example I chose 0.4 as the lowest value was 0.47.
Finally you should update the Background Neutralization section using the following method.
- Create a preview over a small area of background with no stars or nebulosity
- Use readout mode when viewing this preview to define the highest pixel value for R, G, B or K. For me this was 0.018
- Set the 'Upper Limit' to be slightly above this value, I chose 0.02.
- Under Background Neutralisation, tick 'Region of Interest' and use the 'From Preview' button to select the preview you just created.
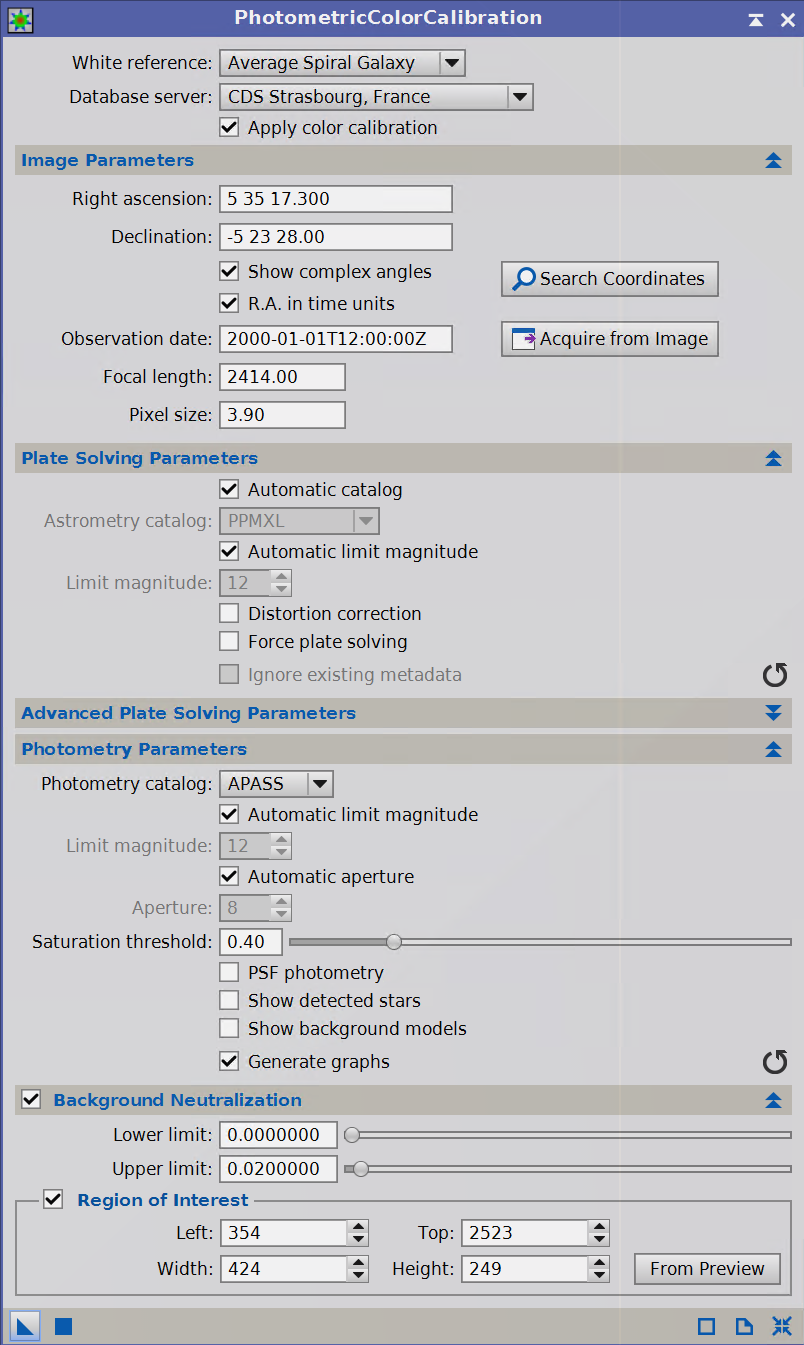
Apply this to your target image, either click the ‘Apply’ button (Blue Square) or drag the ‘New Instance’ button (Blue Triangle) onto the target image. Depending on the speed of your computer and internet this process can take a while, it typically takes my computer around 6-7 minutes.
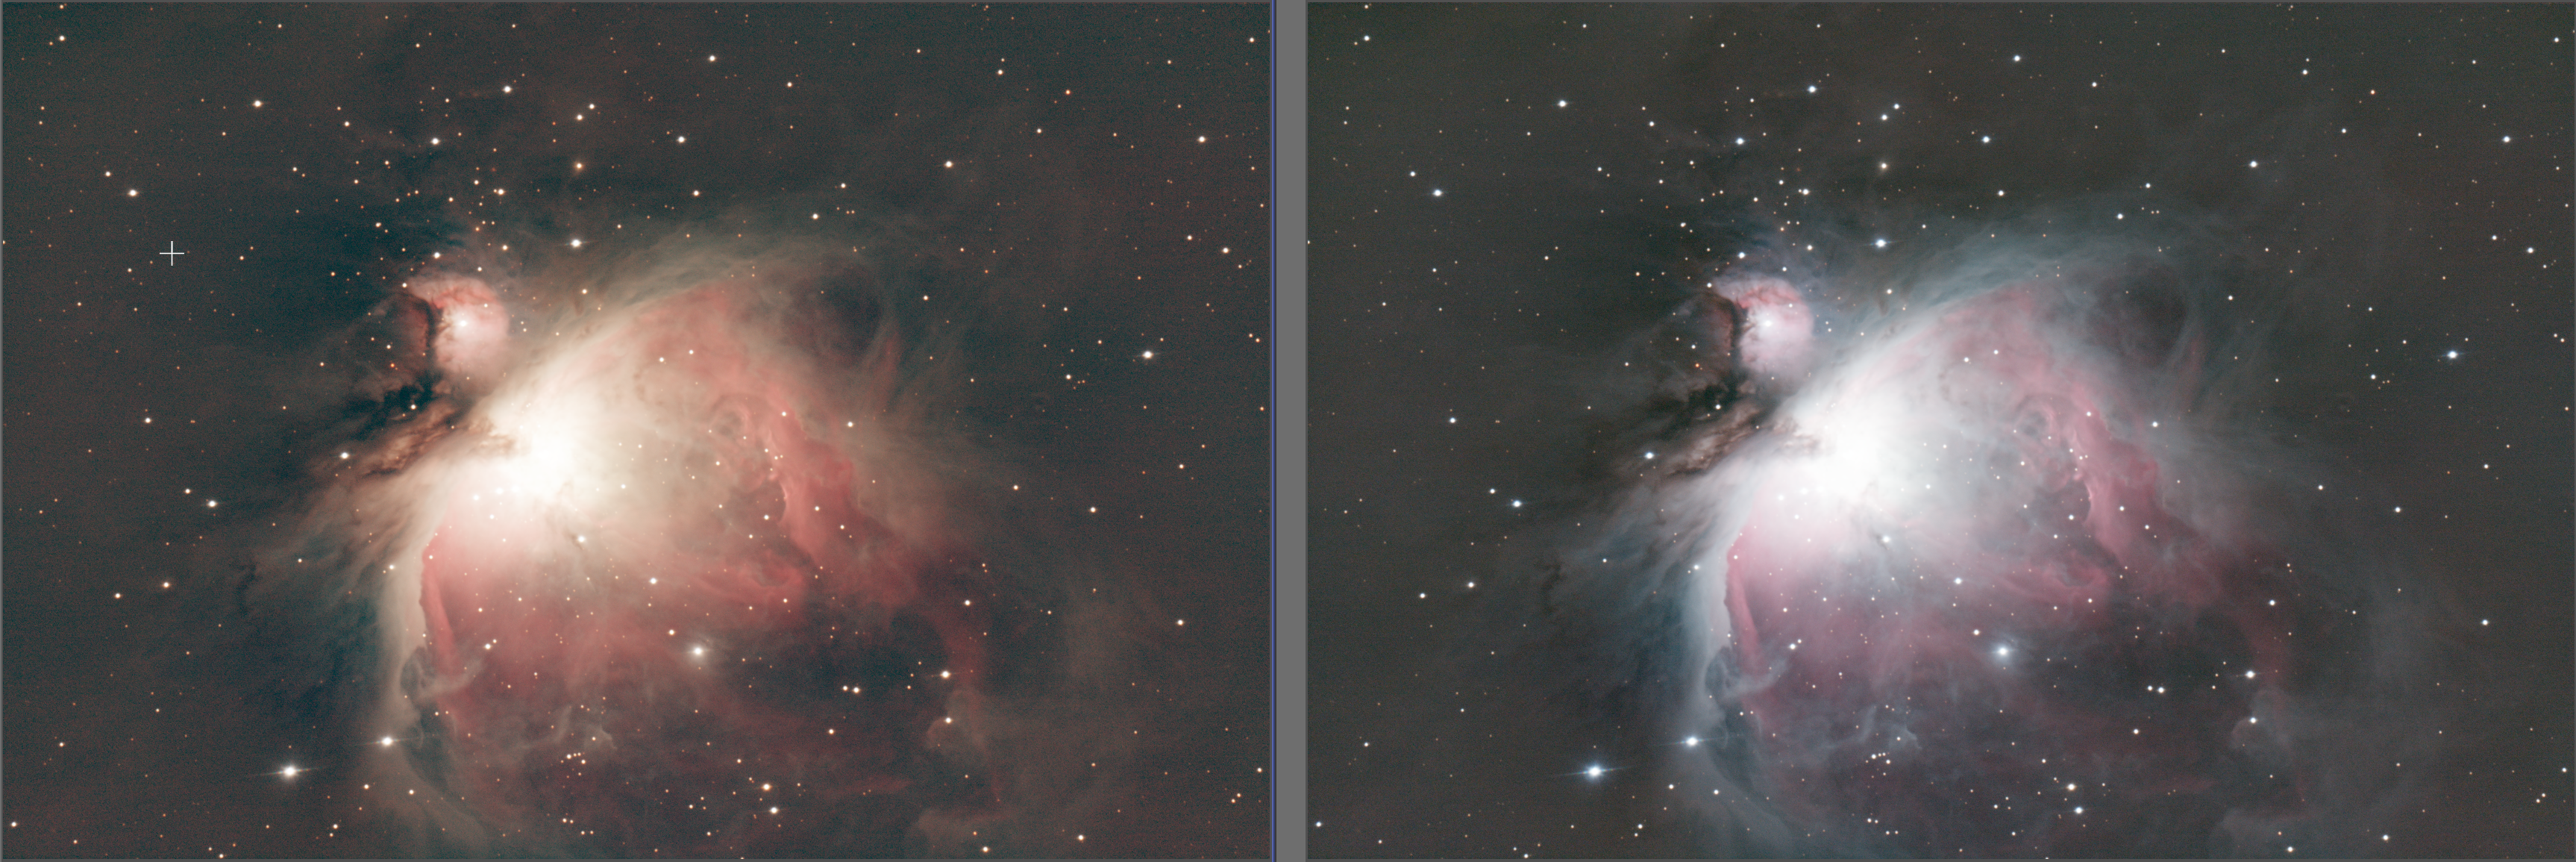
Once complete it will display a couple of charts, I generally just close this. Now Auto-stretch your image with the Link RGB channels active (top left icon), you should see the colours have improved. The image below shows the before (left) and after (right) of this process, the change is quite dramatic.
2.5 SCNR
This process is used to remove or neutralise any green tinge in the image. Very few astronomy targets are green so we know that any excessive amount of green is probably due to light pollution or other earthly sources. This is another process which I use the default settings, first open the process; ‘Process Menu > All Processes > SCNR’.
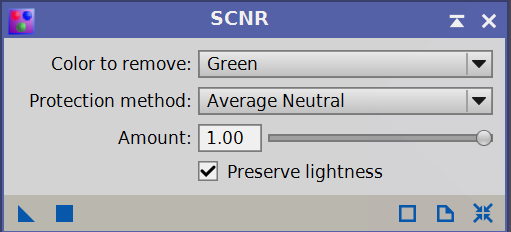
Apply the process using the usual method, either click the ‘Apply’ button (Blue Square) or drag the ‘New Instance’ button (Blue Triangle) onto the target image. That is the process complete and any extra green in your image should be gone.
2.6 Deconvolution
There are many different guides on how to use Deconvolution, I try to follow the method presented by ‘David Ault’ on the Astro Imaging Channel on YouTube. This is quite a long process in terms of number of steps but it requires very little customisation until the final step.
For this section I will assume you have downloaded ‘Linear Processing – Stage 3 – Deconvolution.xpsm’ from my website as this contains all of the process icons I will mention below.
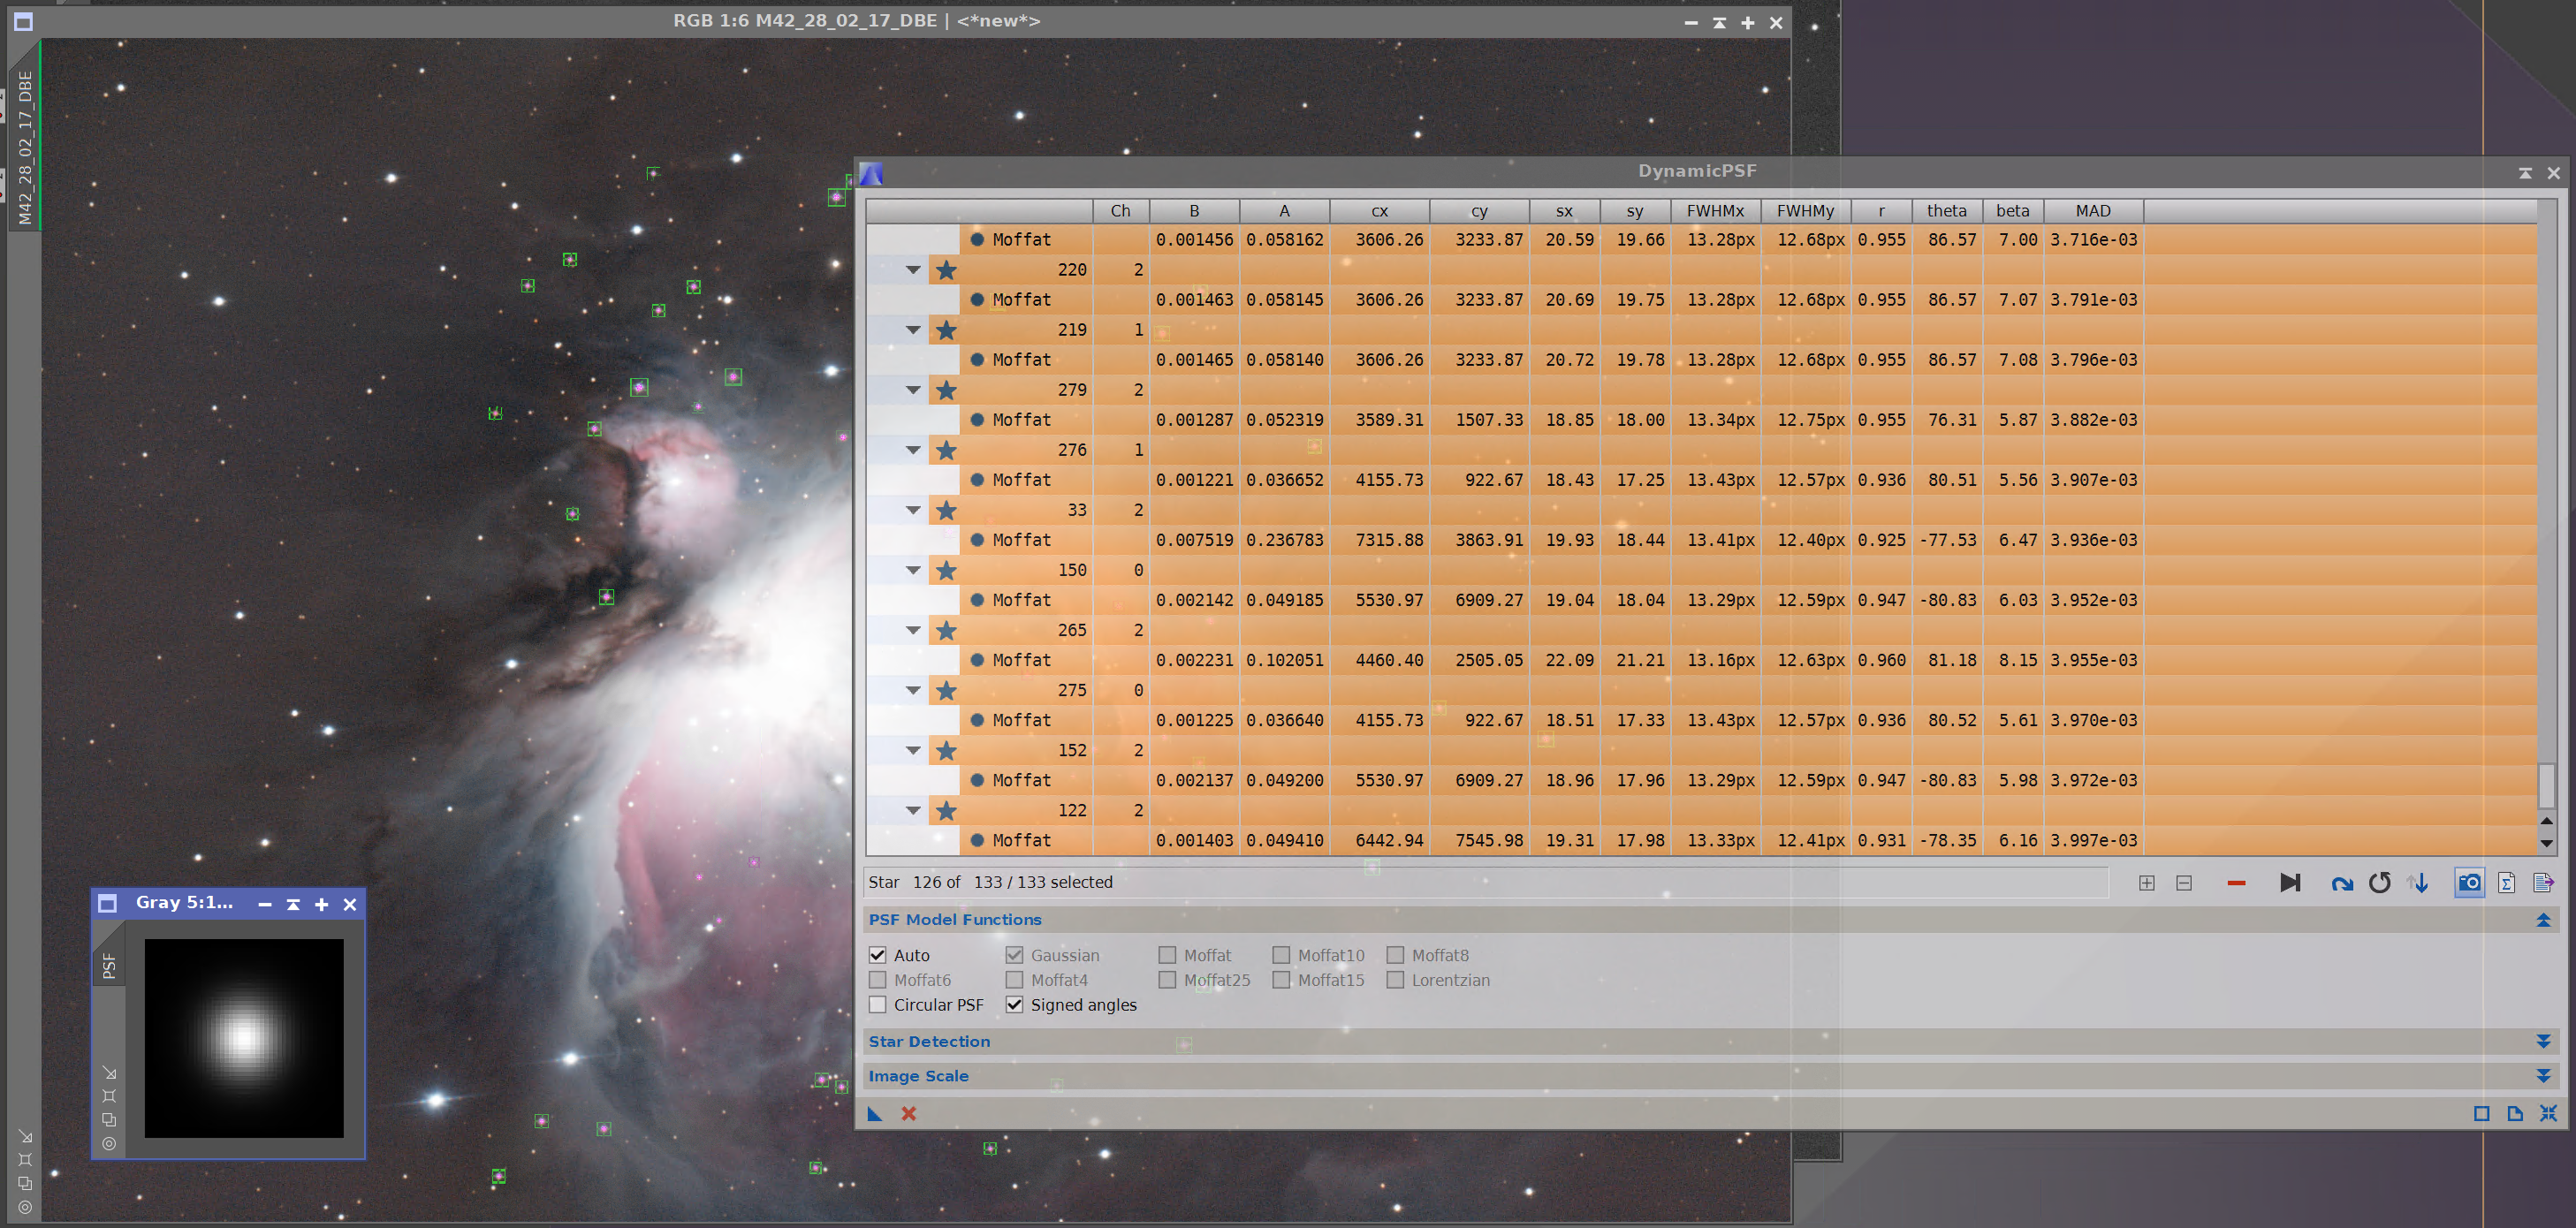
- First you want to generate a model which represents your star shapes, called a PSF.
- Open ‘Dynamic PSF’ and select around 300 stars in your target image, primarily around the target. It is best to not select the really large stars if possible.
- Remove any stars not of the type ‘Moffat’.
- Sort stars by MAD, remove any stars larger than the main groups exponent value. I tend to aim to have around 60 stars in my final image. If you click any of the stars in the list you will see the total number in the lower left of the window.
- If your PSF star is a small star within the black box, less than 1/3 of the box size, you will need additional steps.
- Instead of clicking Camera Icon, click icon that looks like a page with Sigma on it.
- Click Camera icon on window that comes up. Use the readout at bottom of Pixinsight to determine resolution of second PSF.
- Open ‘Crop’ tool, select first PSf from dropdown and insert resolution from second PSF, apply the crop to the frist PSF.
- Open Histogram Transformation and select first PSF in the drop-down. Click the tick at the bottom right and click ‘Auto Zero Shadows’. Apply this to the first PSF and that’s your final PSF created.
- Next you should create a good star mask, follow my other tutorial. Rename it ‘star_mask’
- Clone the original image and apply the STF autostretch to it using Histogram Transformation. Rename it ‘deconv_mask’.
- Clone the deconv_mask and rename it ‘nr_mask’. Apply the process icon ‘HDR Flatten’ to nr_mask.
- Clone nr_mask and rename it ‘tmp’. Apply the process icon ‘Enhance Contrast’ to ‘tmp’.
- Apply the process icon ‘Identfy_contrast_structures’ to ‘deconv_mask’.
- Apply the process icon ‘Noise_reduction_on_deconv_mask’ to ‘deconv_mask’.
- Use ‘deconv_mask’ to mask the target image.
- Open the Deconvolution Process and select ‘star_mask’ as the local support image. I typically find that 50 iterations gives the best results but feel free to reduce this if you find the image getting to ‘clumpy’.
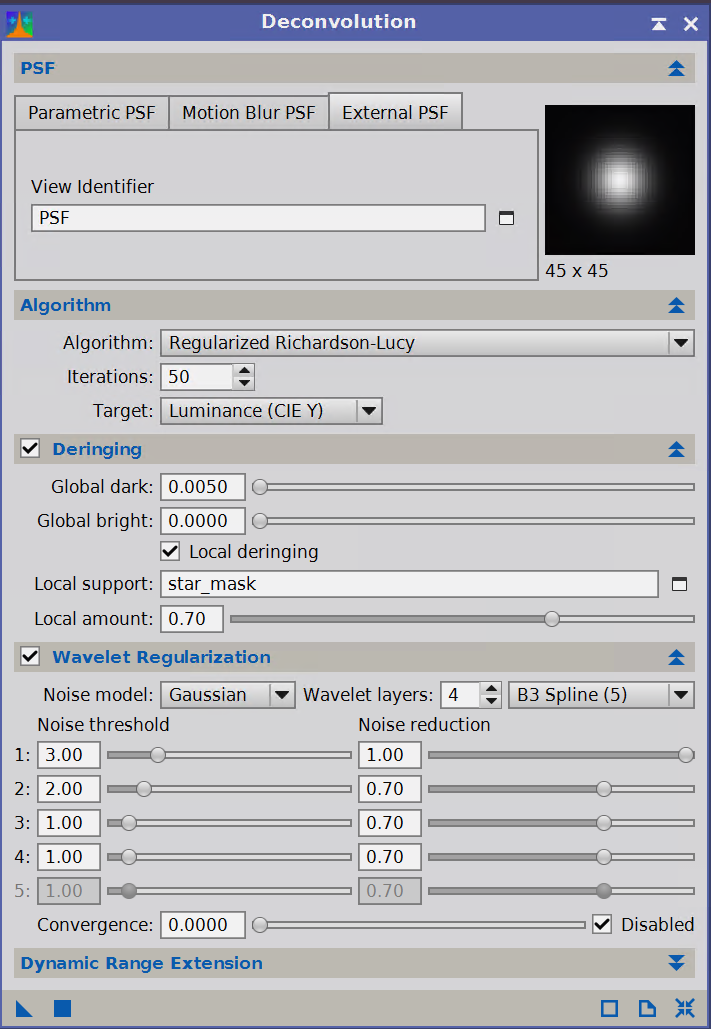
Apply the process using the usual method, either click the ‘Apply’ button (Blue Square) or drag the ‘New Instance’ button (Blue Triangle) onto the target image.
For this image there wasn't a great deal of improvement as the data was very good, I generally observe a bigger improvement when the PSF shows a distorted shape.
2.7 Linear Noise Reduction
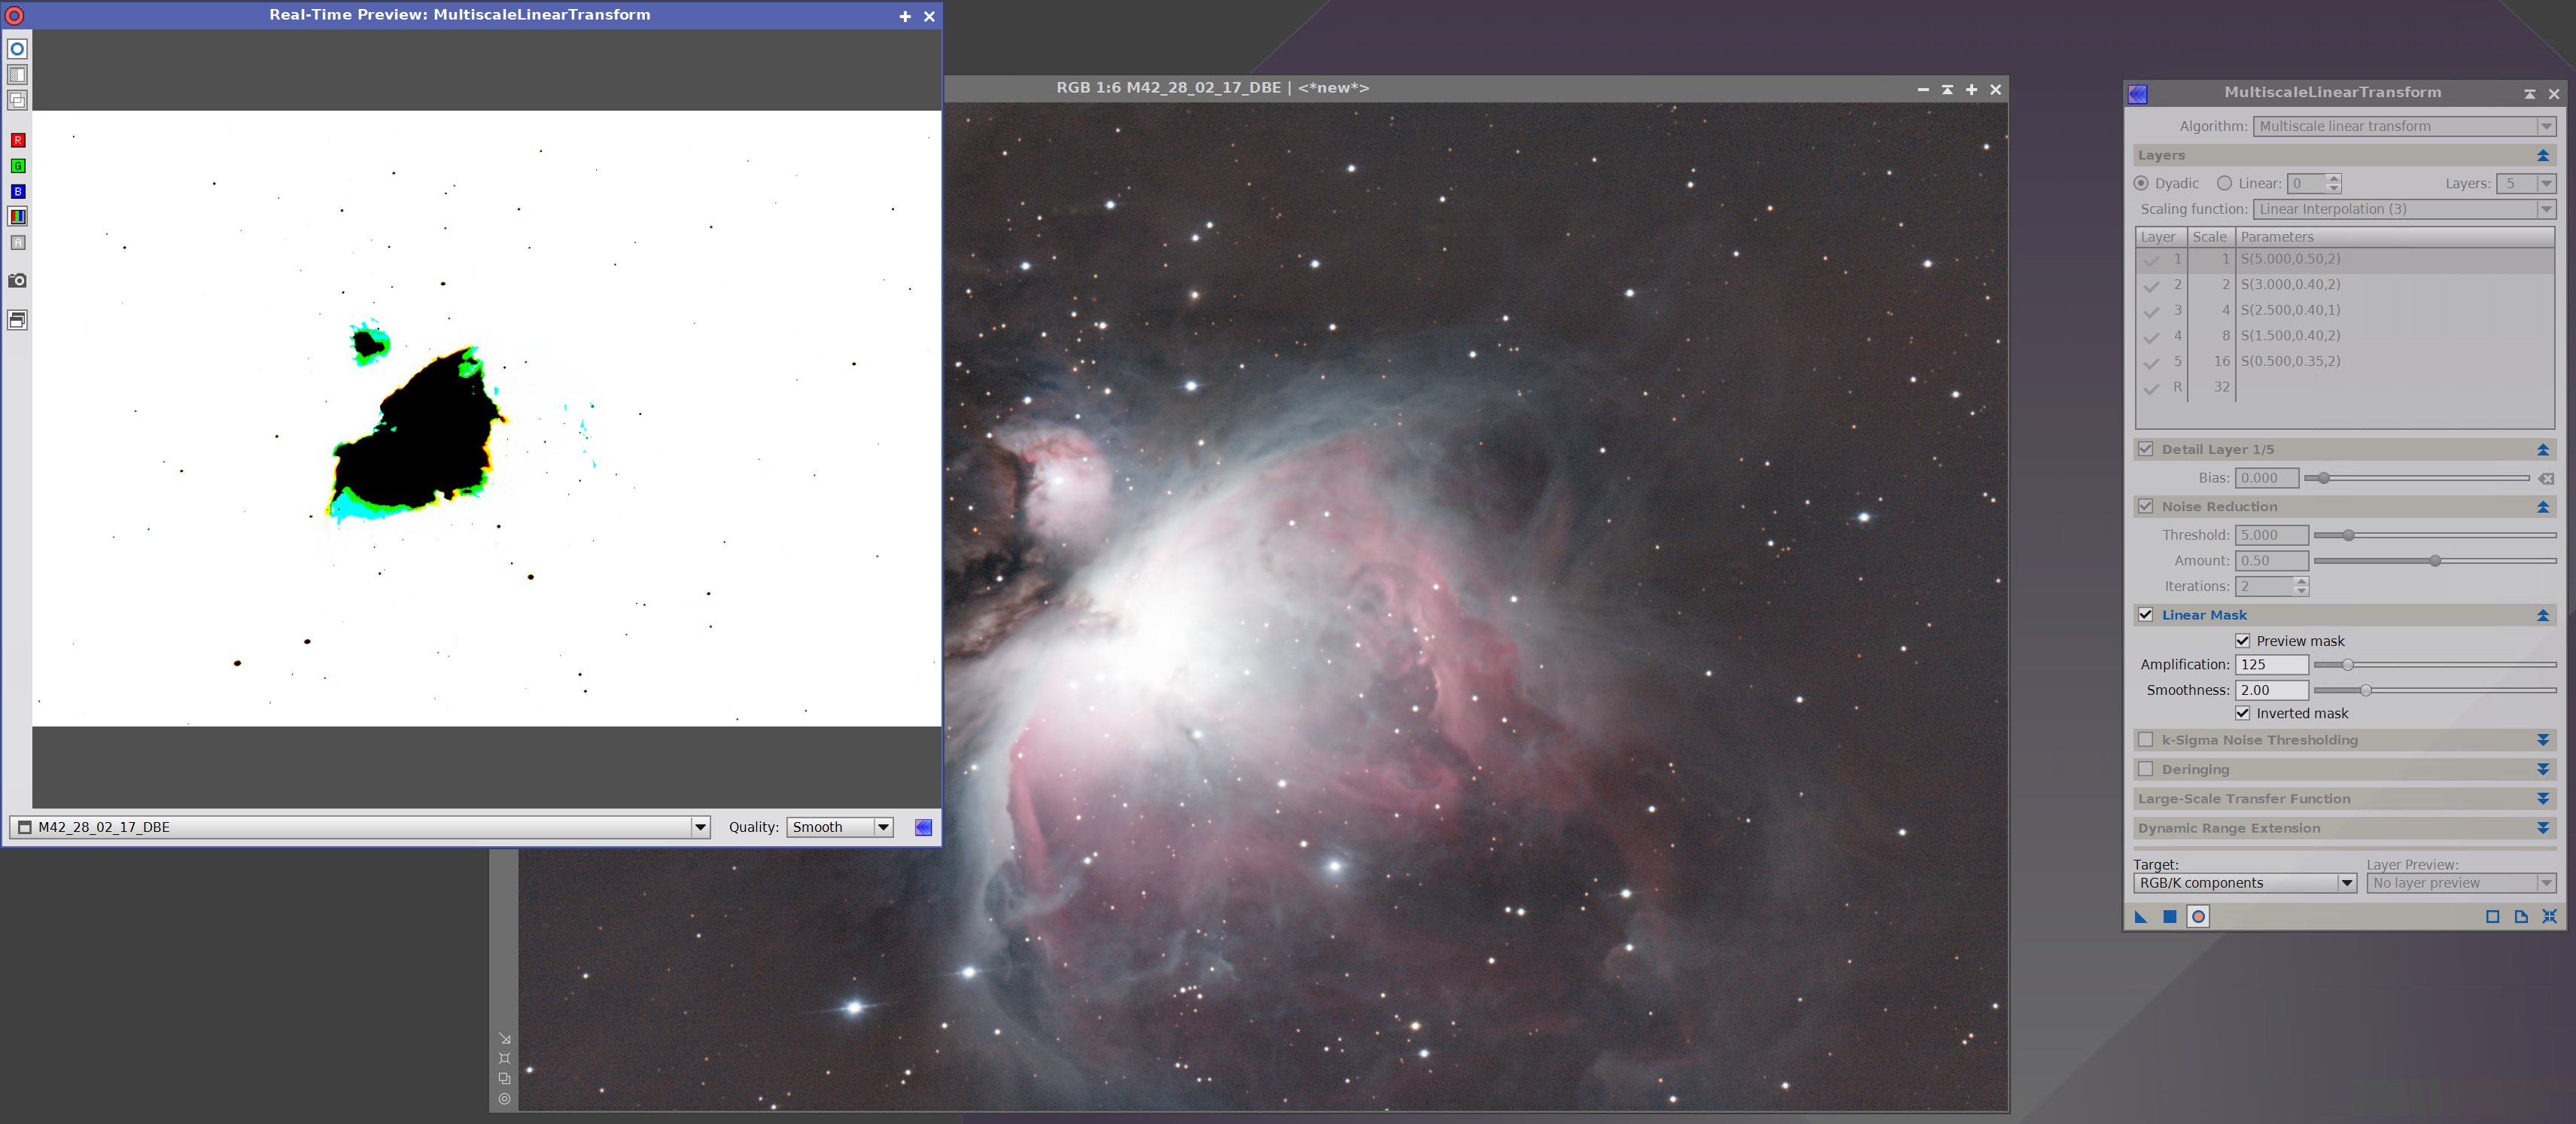
The final stage of my linear processing is noise reduction using 'Multiscale Linear Transform'. I try not to be overly agressive with noise reduction at this stage as we have further noise reduction steps in the non-linear processing stage. First open up the process, 'Process Menu > All Processes > Multiscale Linear Transform'. Update the settings to match the screen shot below:

- Now open up the 'Real-Time Preview', it's the open circle button in the bottom right. It may take a few minutes to load depending on the speed of your computer.
- Once the preview has loaded tick the box beside 'Linear Mask' & also the box beside 'Preview mask'. It may take a few minutes to load depending on the speed of your computer.
- Adjust the 'Amplification' slider to change the size of the mask. You want the black portion of the mask to cover the really bright part of your image as you don't want to apply noise reduction to high signal areas.
Once you are happy with the mask untick 'Preview mask' & apply the process using the usual method, either click the ‘Apply’ button (Blue Square) or drag the ‘New Instance’ button (Blue Triangle) onto the target image.
The image below shows the before (left) and after (right), the end result is a reasonable reduction in noise without blurring image detail. If you are happy with the result you should save this image as this is what we will be processing later.
This is my pre-processing workflow complete, you can now move on to Section 3: Non-Linear Processing (Coming Soon).